


“Not content to rest on its scaly laurels, phishing has utilized quarantine to pump up its frequency to being present in 36% of breaches (up from 25% last year)” according to the 2021 Verizon data breach.
With phishing attacks on the rise and clearly showing no signs of abating conducting a simulated phishing campaign is a great way to test an organization’s defences. Both the human and the technological kind.
Contrary to popular belief however conducting a successful phishing campaign is not all social engineering, yes you need to compose a legitimate enough looking email to entice victims to click a link (or open a file, hand over credentials, whatever the poison!) but tracking data and making sure your sending domain is considered trustworthy enough to sail past anti-spam filters is just as important. Credibility is key which can take a bit of set-up and planning.
This blog will walk you through some of the technical details and tools available to conduct a successful phishing campaign.
Infrastructure
First up you’re going to need your own publicly accessible smtp server. A simple solution would be a VPS from one of the main cloud service providers, although you’ll need to put in a request for them to open port 25 for you (automatically blocked by the larger providers to, um well, protect against phishing and spamming – so make sure your intentions are clear!).
Before you get too settled in its also a good idea to run your servers IP address through MX toolbox and check its not already on a blacklist. Sometimes cloud IPs can be tainted by mis-behaving neighbours or previous owners so best to know before you put in too much effort installing your setup.
Postfix is a great option to act as mail transfer agent and Gophish is an open-source, all-in-one phishing platform that will help you create email and landing page templates and manage your campaign data. You will need to set up a listener for Gophish on the server to capture clicks and credentials, but they have an awesome wiki to guide you so we wont cover that in too much detail here.
Domain
Now to choose your domain. Ideally purchase an expired domain with a good reputation as this will go a long way towards keeping your emails out of spam. Check out ExpiredDomains.net and look for one with a high number of quality backlinks and a low Majestic Million and Alexa ranking.
Alternatively, try your hand at a homograph attack by spoofing your target domain. In the past, Cyrillic characters were successfully used to appear visually identical to the victim, however most browsers and some mail filters are becoming wise to this technique and will pop a warning message. If you choose this route, try sticking to a conventional number/letter swap (think Goople instead of Google).
Then all you need to do is purchase your domain with your chosen provider and start setting up your DNS records.
Quality Check
At any stage from here onwards you can start testing the spammy-ness of your emails using mail-tester.com. This tool is not only great for gauging your chances of successfully hitting an inbox but also for spelling out exactly where you need to improve.
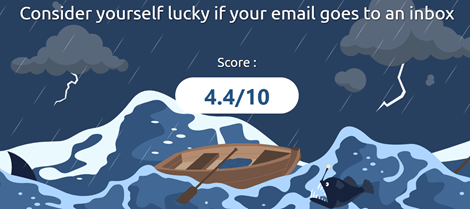
Hm, work to be done!
DNS
Now here’s where things get interesting, having the right DNS setup is key to getting your emails past mailbox spam filters. Aside from adding an MX record pointing towards the IP of your mail server you’ll want to consider the following.
SPF, DKIM and DMARC are the three main security controls that can be added to a domain to make emails more secure, or in our case, more convincing.
SPF
The Sender Policy Framework record is used to confirm which hosts are authorized to send mail for a domain. The receiving mail server will check the address in the FROM header field to verify the SPF record matches the senders IP or hostname.
This is going to get you a lot of street cred so don’t skip it. Besides, creating an SPF record is as simple as adding a TXT record as follows.
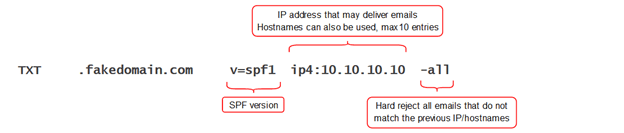
The ‘all’ tag comes with the option of either a hard or soft fail however DMARC will ignore the nuances and treat them both as an SPF fail, so go with either.
DKIM
DomainKeys Identified Mail is an email signing method that ensures the content of your emails hasn’t been tampered with or compromised. It works on public key cryptography, so you need to generate an RSA keypair and store the private key safely on your mail server. You then publish the public key as a DNS TXT record and whenever you send mail your server will add a hash value encrypted with the private key to the mail header. The recipient will then decrypt this using the public key found in the DNS records and if the hashes match, you’re winning.
There are plenty of DKIM generator tools to choose from and your final TXT record should contain at least the following information.

You can choose any name you like for the selector bearing in mind it will be bound to the key pair. This allows you to have multiple DKIM records for your domain should you need them.
DMARC
The DMARC record ties the previous two protocols together by defining the policy that tells your email recipients how they should handle mail that fails SPF and DKIM record checks. It was designed to protect domains from unauthorized use and comes with a cool feature where domain owners can add a policy to send spam and spoofed email reports to an address of their choosing.
Your DMARC record will look like this.

As with the previous records there are more tags to choose from however the ‘v’ and ‘p’ tags are required with ‘rua’ being strongly recommended.
PTR
The final DNS record to add is a PTR record, also known as reverse DNS. This allows anyone to lookup the IP of your server and get the associated domain name and will earn you a couple of extra half points on the credibility scale.
SSL/TLS Certificate
To wrap up the setup side of things it is always a good idea to get a TLS certificate for your domain. Not only will the little green lock lull your victims into a false sense of security but any links to your domain sent in the body of an email will get scanned and checked against blacklists and could get flagged. It’s a small detail that could trip you up so worth the extra few minutes it takes to install a free cert from LetsEncrypt.
Time for a Retest!

You’re aiming for a score over 9 or a perfectly polished 10 here but don’t worry if you still have a few points to make up. Extra points can be gained through a well-crafted email and your Mail-tester results should be able to guide you.
Designing your Campaign
Now for the fun part, you’ve probably already got a pretty good idea of your approach by now but if your stuck for inspiration there are plenty of email and landing page templates on GitHub to get the ball rolling. Will you be targeting everyone or going straight to the top and spear phishing some high privileged employees? Both targets require some level of OSINT, however for the latter you’ll need to put together some custom emails based on topics you know they’ll engage in. This part is limited only by your imagination and some solid OSINT skills, do some digging on social media sites, find out what technology is being used and plan the ultimate amygdala hijack.
As I stated before this blog won’t cover how to use Gophish, its very user friendly and there are tonnes of great resources on the web to assist you. But armed with your new, highly credible domain the rest should be plain sailing. Happy phishing!